
Virtual Whiteboard
Best Practices and Options
Best Practices for Hybrid Teaching
If you are teaching from a classroom to both in-person and remote students, the best practice is to use a virtual whiteboard that you project within the classroom. This option allows both in-person and remote students to see what you are writing. Remote students are often unable to see what you write on the physical whiteboards or chalkboards in your classroom no matter what methods you use or how large you write, especially after the board is erased or becomes cluttered.
Summary of Options
Options for virtual whiteboards exist along a spectrum, from physical to virtual. Physical refers to the instructor writing on physical equipment in front of them and then projecting; virtual refers to exclusively writing electronically on a device.
| Physical | Tablet | Virtual |
| Use markers on a small whiteboard or pen and paper | Use a Wacom pen tablet, tablet computer (e.g. iPad or Surface) | Use an input device like a stylus, mouse, or trackpad on a virtual software whiteboard |
| Drawings are shared using document cameras, webcams, or smartphone cameras connected to Zoom | Drawing on the tablet or screen is shared in Zoom | Drawings are digitized and shared in Zoom |
On the physical end of the spectrum, instructors write using markers on an individual size whiteboard or draw with pen and paper. They can then use a dedicated document camera, webcam, or smartphone camera connected to Zoom to share drawings with their students.
In the middle range, instructors write physically using a stylus linked to a drawing tablet like the Wacom pen tablet or a tablet computer such as an iPad. These devices convert the stylus writing into virtual form on a virtual software whiteboard that is shared in Zoom.
On the virtual end, instructors can use a variety of input devices such as a mouse, trackpad, stylus, or other input device to write virtually on a virtual software whiteboard like those offered in OneNote, MS Teams, PowerPoint, etc. Virtual whiteboards can be shared with students using Zoom.
Zoom
Overview
Zoom makes it possible to share handwritten content for remote teaching and learning. You can use a variety of methods to simulate the experience of a chalkboard, whiteboard, or document camera, whether you use Zoom for live, synchronous teaching or pre-recorded, asynchronous content for your class.
Zoom Annotation Tool
This tool allows you to draw freehand or insert shapes, lines, and text.
Students in your class are able to annotate on shared screens by default. You can manage this default setting in your rochester.zoom.us profile.
Zoom annotation tools work best when you are sharing prepared content you want to explain for emphasis, such as a PowerPoint slide, reaction mechanism, chemical structure, or other graphic you want to draw on, including graph paper or a musical staff.
Zoom Whiteboard Tool
Instead of using annotation tools to mark up a slide, graphic, or text, you can use the same Zoom annotation tools to write on a blank screen using the Zoom whiteboard. The Zoom whiteboard works best for ad-hoc annotation or idea sharing. When combined with the pen tablet option under saving a Zoom whiteboard below, Zoom whiteboards can be used for finer detail, such as equations or chemical structure drawings.
The Zoom whiteboard tool becomes available when you have participants in your meeting, and you click on “Share Screen.”
- Click the Share Screen button located in your meeting tool bar.
- Click Whiteboard
- Click Share
- The annotation tools will appear automatically; you can click the Whiteboard option in the meeting controls to show and hide them.
For more information see Zoom’s Sharing a Zoom Whiteboard article, and Zoom’s whiteboards and annotation tools article.
Note: Students in your class are able to draw on the whiteboard by default. You can manage the Zoom Whiteboard default settings in your rochester.zoom.us profile.
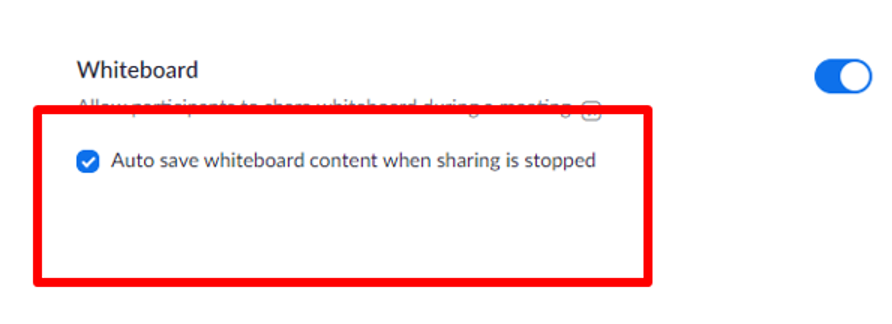
Saving a Zoom Whiteboard
You can save the whiteboard as a PNG image file and the Zoom whiteboard can be configured for auto-save with a simple checkbox. Note that the Zoom Whiteboard PNG image file cannot be further edited in Zoom after the Zoom session ends.
The default drawing controls for the whiteboard rely on the use of your mouse or a touch-enabled device. For finer control of your drawing, consider an input device like a Wacom Intuos Pen tablet, available from the UR Tech Store for less than $100. The pen tablet connects to your Mac or PC via USB and allows for greater precision than drawing with a mouse or finger. Note: An input device like a Wacom pen tablet has a learning curve and will require some practice to master.
Learn more about the Wacom Intuos by watching this video.
Use an iPad or Surface Tablet with the Zoom Whiteboard
If you have an iPad or Surface tablet, you can use it to annotate during hybrid teaching with the Zoom whiteboard.
- Launch and host the Zoom meeting from your computer and select record.
- On your iPad or tablet, launch Zoom on this second device and join the meeting with all audio muted.
- Share the whiteboard from the iPad /tablet screen and draw or write there.
- Students will be able to see your work as you write, and it will be recorded.
- Use a stylus for more precise annotations.
Note that specialized options like iPads, tablets, or other annotation technologies are an additional expense that must be paid for by the instructor.
Native Drawing and Collaboration Tools in Other Applications
Many allied applications such as Notability, PowerPoint, Word, MS Teams, and OneNote have built-in annotation tools you can use on your device while sharing your screen with Zoom. Your annotations will be seen by and recorded for meeting participants. Note: The MS Teams whiteboard tool only becomes available in meetings with three or more participants.
Additional information on various applications:
Annotating on a touch-enabled device like a tablet, MS Surface, or iPad when combined with a stylus and an application like Notability, OneNote, or Teams allows you to create fine and precise drawings. This option is the costliest and may work best for classes that would have relied on blackboards or chalkboards for equations, such as mathematics and chemistry.
Get digital graph paper or digital music staff (do not click the pop-up ad, simply select the Clef you need and save as a PDF).
You have additional options when using PowerPoint as an alternative to the Zoom whiteboard.
- Create equations directly on the slide using the text features of PowerPoint and animate the adding of new information to the slide as if you were writing in chunks. You can also paste equations step by step from a scientific writing program like LaTex or MatLab, etc.
- Draw your equations for the full slide on a piece of paper and take a picture; add this to the slide as one whole screen. Then, cover the screen with “blocks” of white and animate their removal as you teach to reveal the equations step by step, as if you were writing.
- You can still annotate and draw on your equations and slides using the Zoom annotation tool.
Document Camera
Location
Home or Office
If you have an external webcam, smartphone, or tablet, you can create a makeshift document camera that can be used to show your handwritten work using paper and pencil or marker on a small whiteboard. These are low-cost options and work well for classes that would have relied heavily on chalkboards or whiteboards, such as in the natural sciences. Information on two common options is below. For additional detailed instructions, see second camera sharing under the appendix below.
Classroom
Document cameras may also be installed in your classroom or delivered by ECM. Your writing on a document camera, simultaneously projected on the classroom screen and shared via Zoom, will be visible to both in-person and remote students. By contrast, writing on the physically installed whiteboard or blackboard on the classroom walls will, in almost all circumstances, not be legible to remote students even when captured by classroom cameras. See appendix on locations of document cameras. You many also contact ECM to see if document cameras are available for your AS&E classroom.
External Webcam
You can set up an external webcam using the following instructions.
- Connect the webcam or document camera to your computer.
- On your computer, connect to your Zoom meeting.
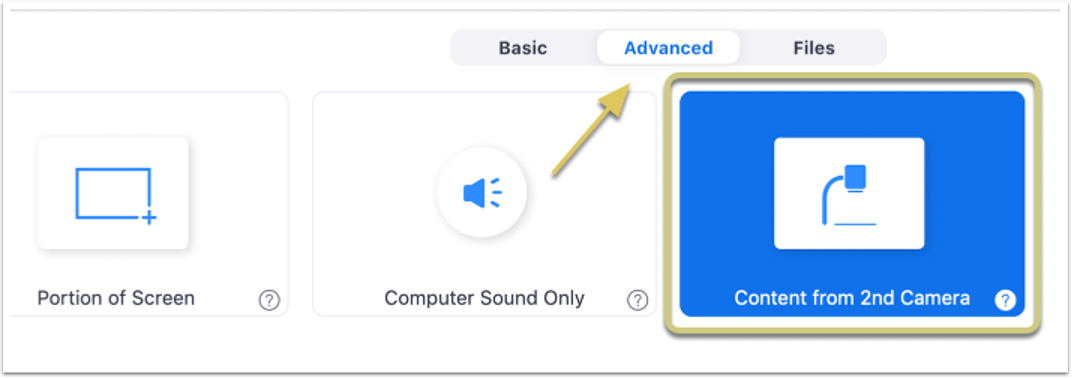
- In Zoom, choose Share Screen. When prompted to select what you want to share, click the advanced tab, select Content from Second Camera, and click Share.
- Position a sheet of paper or a lap whiteboard on a nearby surface and place your webcam on a tripod or makeshift stand pointing at the surface. Make sure the entire paper or lap whiteboard is visible in the camera shot.
- You can use this arrangement to write paper and pencil equations, structures, and diagrams.
Common issues:
- If you see the video from your computer's main webcam instead of the external webcam, click Switch Camera in the top left of your Zoom window.
- If the camera image appears upside down or sideways, open the drop-down menu next to the video icon in the Zoom toolbar. Choose Video Settings, then click Rotate 90° until the image appears right side up.
- Note that the Zoom annotation tools are not available when using this option.
Smartphone Camera
If you do not have an external USB webcam, you can instead use your smartphone's camera as a document camera. To do this, you will need to join your Zoom meeting from both your computer and your phone.
- Connect to your Zoom meeting from your computer. Turn on your microphone and start your video if you want your students to see your face.
- Make sure your smartphone is connected to your local Wi-Fi network. Join your Zoom meeting from your phone. Do not turn on the microphone and turn the volume on your phone all the way down.
- In the Zoom app on your phone, select Start Video to turn on the phone's camera. If you want to switch cameras on your phone, tap the Switch Camera icon (a camera outline with circular arrows) to switch to the front-facing camera. Physically rotate your phone so that the Zoom app appears in landscape orientation.
- Position a sheet of paper on a nearby surface and place your phone on a box or stand with the camera pointing at the paper. Make sure the entire paper is visible in the camera shot.
- On your computer, you will see the video from your phone in a small pane at the top of the Zoom window. Click the ellipsis (...) in the upper right of that pane to open an options menu. Click Spotlight Video to prominently display the video from your phone to all participants; for more on spotlighting, see Spotlight Video.
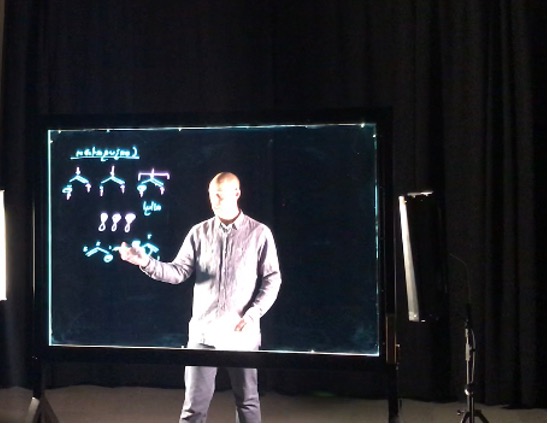
You may also want to learn about pre-recording asynchronous equation-rich lectures using our LightBoard.
Appendix
Second Camera Sharing
Zoom allows instructors to share a feed from a second device in order to show students an alternate view. A camera connected to your computer can be used as the second device to show a document, a physical whiteboard, or an activity taking place in the room. A smartphone or tablet connected to your computer can be used as the second device to show activities on that screen, such as drawing on a sketching app or using any other app. If you do not need the camera, you may also wish to join your Zoom meeting as a participant from that mobile device and share your content/screen that way.
How to Set Up a Second Camera
See instructions below for both options, including for iOS and non-iOS devices.
Enter a Zoom meeting and click the Share Screen Option.

To share from a built-in second camera, click the 'Advanced' tab, then click on 'Content from 2nd Camera', and click 'Share.'
If you have no second camera or device connected, your front-facing camera will activate and share to the meeting.
If you are connected to the meeting with a device that has a rear-facing camera, such as a Microsoft Surface, that camera will activate and share to the meeting. You can also switch between the front and back cameras by clicking 'Switch Camera' at the top left.
Instructions for sharing from an iOS device are below. Instructions for sharing from a non-iOS device are further down in this guide.
Note carefully: Screen mirroring will not work on campus at the University. This feature only works work at home on your wireless network; it is disabled on the University’s network for security purposes and will not function in your office or a classroom on campus
Screen Mirroring with an iOS Device
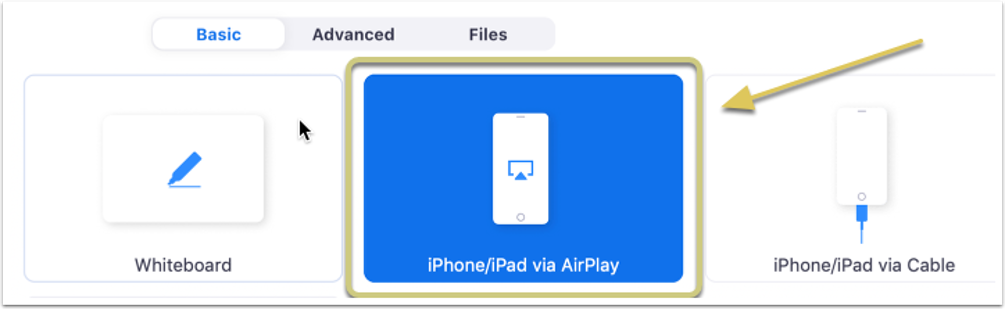
Screen mirroring from an iPhone/iPad via AirPlay allows the instructor to use the camera on their Apple device as a second camera to stream activity in the room. Note that AirPlay will work on home WiFi networks but is not permitted on the University’s wireless network. Use the cable option or join the Zoom meeting directly without AirPlay.
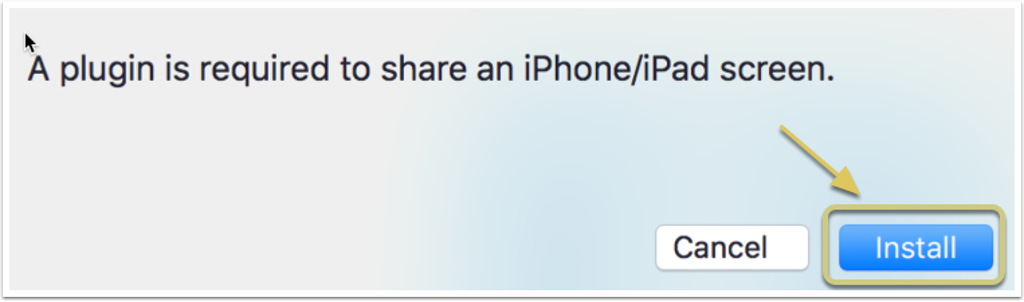
In Zoom, click 'Share Screen,' then click 'iPhone/iPad via AirPlay,' and click 'Share.'
If asked to install a plugin, tap ‘install.'
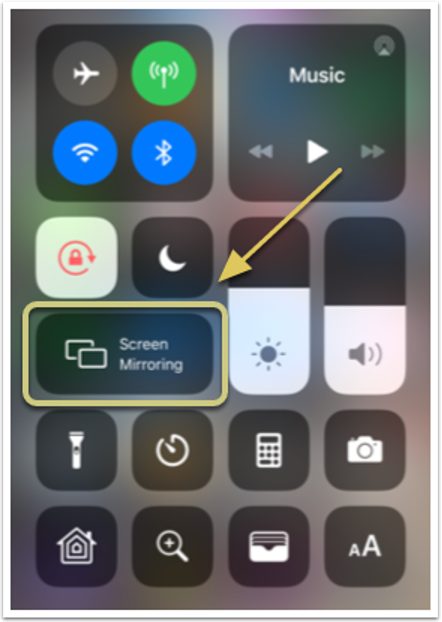
Swipe up on your iOS device and tap 'Screen Mirroring.'
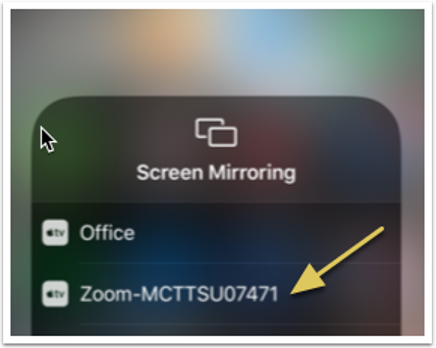
Instructions will appear on your computer screen for connecting your device.
If you have trouble mirroring, be sure that the device and the computer are on the same Wi-Fi network. If the AirPlay icon won't appear even when an Apple TV is nearby, go to System Preferences > Displays > Display and choose "Show mirroring options in the menu bar when available." On your iPhone, iPad, MacBook, iMac, or Apple TV, toggle off Wi-Fi and then turn it back on.
Learn more about screen share using AirPlay mirroring.
Select the Zoom meeting option to connect to the meeting.
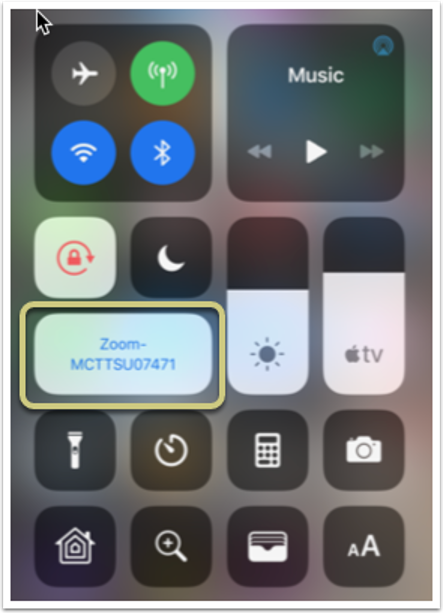
Once connected, the device will display the mirroring connection and share to the meeting.
You may now swipe to change to another app or to the camera to mirror that view to the meeting. You may use a drawing or whiteboard app like Notability on your device, which will circumvent the limitations of the Zoom whiteboard, which is only available during sharing. While mirroring, whatever is displayed on the screen of the device (or whatever the camera app is pointing at) will be shared to the meeting.
Swipe up and click 'Stop Mirroring' when you are done sharing your iOS device screen.
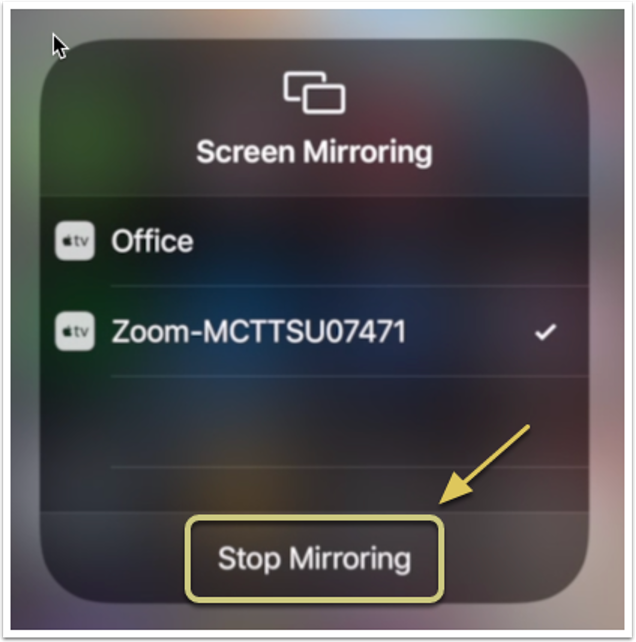
When you are finished, swipe up to return to the iOS device control menu, click on the mirroring connection, and click 'Stop Mirroring.' You may then click 'Stop Sharing' on the meeting as well.
Note: If you are using a Mac, you may also share from an iPad/iPhone using a wired connection. This is useful when you are on a University network in your office or a classroom and features like AirPlay are disabled for security purposes.
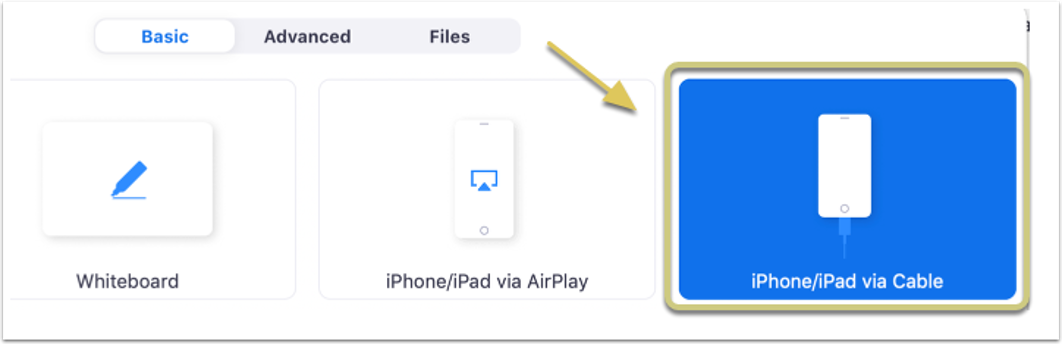
Connect the device to the computer with the cable. You will be asked to 'Trust' the computer and to enter your passcode.

If you do not have a built-in second camera, you can substitute an external iOS or Android device (see above for instructions specific to Apple devices).
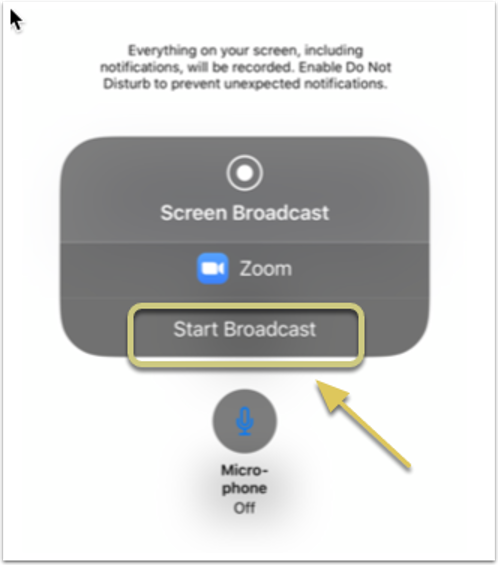
Screen broadcasting from any device allows the instructor to use the camera on their alternate device camera to stream activity in the room. This involves hosting the meeting on your computer and also joining as a participant from your smartphone. On an iOS or Android device, join a Zoom meeting using a join link or the Zoom app.
Click 'Share,' and then 'Screen,' and then 'Start Broadcast.'
You may now swipe to change to another app or to the camera to share that view to the meeting. A running timer will display in the upper-left corner of the screen.
You may use a drawing or whiteboard app on your second device. This circumvents the limitations of the Zoom whiteboard, which is only available during actual sharing. With a second device, you can continue to draw even when the second device is not being shared. Plus, you can switch over to sharing it at any time.
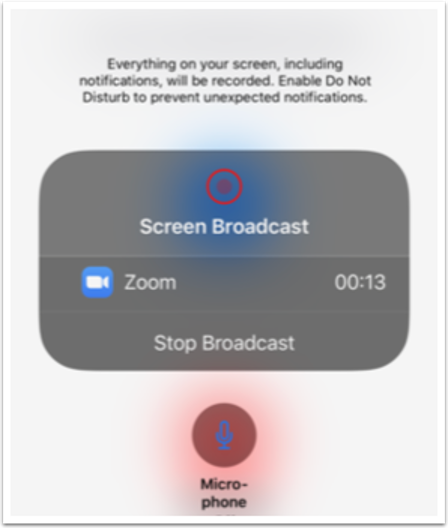
When you are finished sharing from the second device, click the timer, then click 'Stop' to stop broadcasting. While broadcasting, whatever is displayed on the screen of the device (or whatever the camera app is pointing at) will be shared to the meeting.
You may also wish to turn on the Annotation feature to allow participants to annotate on a shared screen.
See also:
- YouTube demoof a Smartphone document camera setup with a gooseneck holder
- Apple documentationon how to record the screen on your iPhone, iPad, or iPod touch
Locations of Classroom Document Cameras
The following classrooms are equipped with document cameras:
- Bausch & Lomb 106
- Bausch & Lomb 109
- Computer Science Building (CSB) 209
- Computer Science Building (CSB) 601
- Dewey 1-101
- Dewey 2-162
- Gavett 206
- Goergen 101
- Goergen 102
- Goergen 108
- Goergen 109
- Harkness 114
- Hoyt 104
- Hutchison 141
- Harkness 210
- Meliora 221
- Morey 321
- Lower Strong
- Wegmans 1400
- Wilmot 116